
How To Install Roll Vinyl Flooring In Kitchen?
Before placing our new roll vinyl sintasol, we must know that these usually measure 2 or 4 meters wide as a general rule.
It could also be the case of finding 5-meter rolls usually installed in large areas such as stores, educational centres or offices.
We advise you, whenever you can choose, 2-meter rolls to facilitate work and handling unless we are going to renovate the floor of a vast room.
Tools to install vinyl flooring in roll
- Double-sided tape or glue
- cutter or scissors
- Rule
Prepare the surface as you have read before in the tips, and buy your floor on a roll with an addition of 40-50 cm. extra to the measures initially taken to have a safety margin.
If necessary, remove the previous coating and remove any remains that may have remained, such as dust, dirt and glue.
In case you need to make a splice because you have fallen short somewhere, you can overlap 10 cm. and paste both parts with double-sided tape or glue.
If you have had a mistake (anyone can), always make the splice as far away from the entrance of the kitchen, bedroom or bathroom.
Also, disassemble the skirting boards that you have to facilitate the installation. Later, we will put them back.
Ground levelling
⇒STEP 1
You must level the floor to prevent irregularities from being marked over time in your new vinyl floor, so you must apply, having cleaned the previous paving well beforehand, a mortar or levelling paste to cover imperfections such as joints or foundations.
Very important! This step is critical since I can assure you that if the coating that is underneath is not perfectly level, over time, the marks will appear on the vinyl floor in roll, and they will be accentuated as more is stepped on and with time.
Sanding of the mortar or levelling paste
⇒STEP 2
Once the mortar is dry, we sand the excess product to leave it smooth so that our old floor is entirely level, straight and free of dust.
We can pass a vacuum cleaner to quickly remove all the dirt after sanding.
Subsequently, 24 hours before placing the vinyl floor, we must unroll it to remove any wrinkles and folds it may have had during transport.
Laying Floor Vinyl in Roll
⇒STEP 3
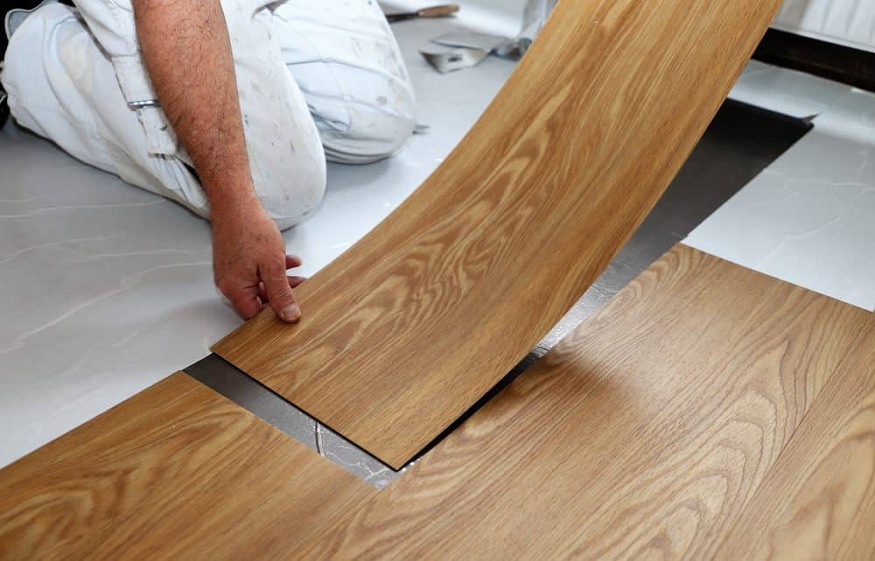
Extend the vinyl flooring roll from the centre of the room towards the walls and adjust it with your hand or a rubber spatula until it is presented and we can see that no corner or edge is left uncovered.
We must ensure this since a cut here can lead to an irreversible situation, and we have to make a splice or buy more vinyl rolls.
Mark with the scissors the cutting lines to be followed in the corners with the wall and the vinyl floor wholly attached to the corner, cut with the cutter in one pass.
Once we do this on all sides of our room, we will have our new PVC floor presented and placed.
Floor Adhesion in Roll
⇒STEP 4
So that it does not move while we carry out the entire installation, we will put strips of double-sided tape on the ends that we will cut to adhere the rolled floor to the previous coating.
If the room measures less than 12 square meters, we will only have to place double-sided tape around the perimeter. If it is more extensive and up to 20 square meters, we will need to put double-sided tape every 1 or 2 meters.
To install roll vinyl flooring in rooms more significant than 20 square meters, we will use glue as an adhesive to the previous floor.
The way to apply the double-sided tape strips is straightforward. We must fold the vinyl floor roll in half and stick said tape along the edge or every meter, depending on the size of the floor to be placed. When we have hit this half to the ground, we will perform the same manoeuvre on the other remaining half.
In the case of the adhesive glue, we will act in the same way, only instead of applying it on the roll, we will do it on the previous paving, and once we expand it on its surface, we will drop the vinyl flooring so that it adheres.
Wrinkles may remain at the end of the roll floor installation, but don’t worry; just pass your hand to take it to a corner and adjust it to the edge. To do this, you may need to remove the double-sided tape and even make a cut if the floor is mounted on the wall.
Finally, if you have baseboards, you can put them back now. If you need something to separate two types of flooring, you can fit a transition profile.